
To import POS data click
Select next to the mapping to be used when uploading the new POS data. Then confirm the period the POS data applies to, click "Select File" and browse to the location of the file to be uploaded. Once the file upload is complete (background turns green) click "Process" to import the POS data. The POS data file imported must be formatted to match the mapping. If the POS data file has a different format it must be changed or a new mapping created that matches the file's format.
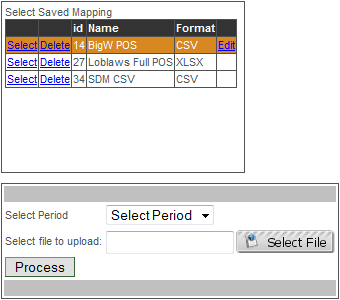
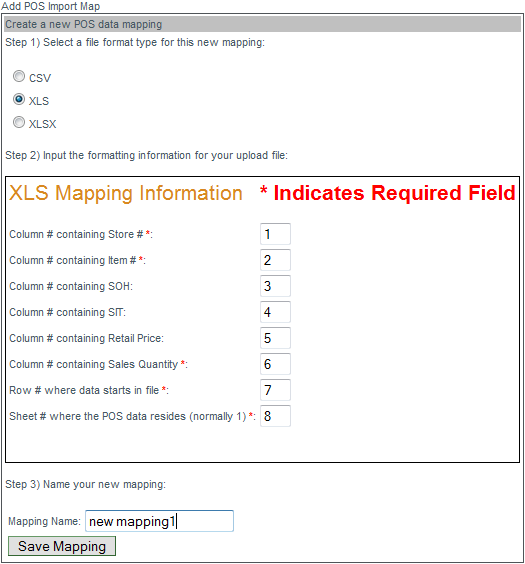
To add a new POS mapping click
Create New Mapping and select the file format that will be used when importing POS data (CSV-comma separated values, XLS-Excel file, XLSX-Excel 2007 and later). Enter numbers into the mapping information box to set the order of data contained in the imported files.
EXAMPLE: if your POS data file lists the item# first then put a '1' next to 'Column containing Item#, if the imported file lists the item# third then place a 3 next to the item# column). Please note there are 5 fields where a number is mandatory (marked with a red asterisk). Once the mapping order information has been set, give the mapping a name and click "Save mapping". You may now import POS data to the new mapping.

to
To view POS data select a period from the drop-down menu and the data for that period will be displayed. Review the data and if necessary click
Edit to modify the SOH and/or SIT then click
Update to save the changes. To delete a line from the POS data click
Delete.
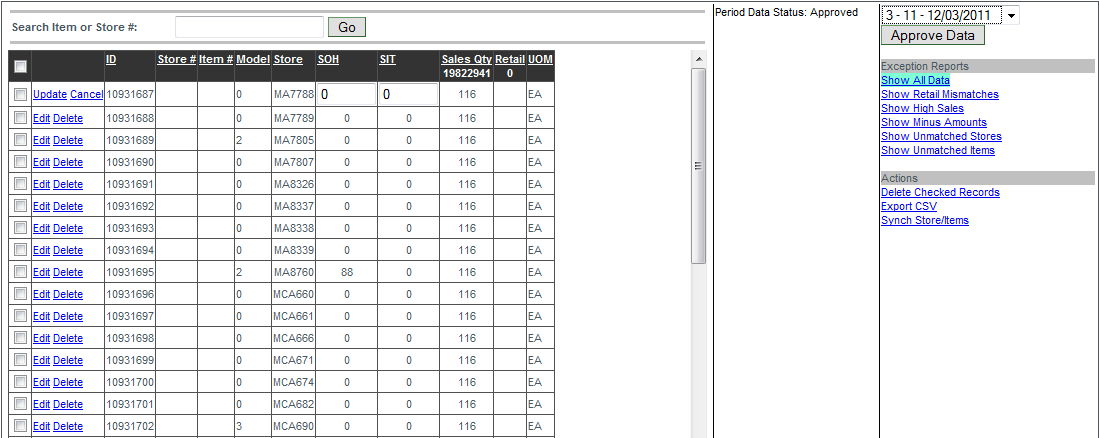
Exception reports are available and will display records falling outside of expected quantities. To view an exception report click on the report name below "Exception Reports".
Exception Reports
Show Retail Mismatches: This report shows all items that were scanned at sale for a price different than the price listed in acuFILL.
Show High Sales: This report displays all sales data for the period listing the data highest sales to lowest.
Show Minus Amounts: This report shows all records that show a SOH of less than zero. Stock on hand cannot be less than zero.
Show Unmatched Stores: This report shows any records containing a store number that does not match the store numbers associated with a retailer.
Show Unmatched Items: This report shows any records containing an item number that does not match the item numbers associated with the vendor.
Actions
Delete Checked Records: Use this to delete several records at once. Select the records by clicking the empty boxes next to all records to be deleted then click
Delete Checked Records, all selected records are immediately removed.
Export CSV: Use this to export a CSV file of the exception report that is currently displayed on the screen.
Synch Store/Items: This tool is used to correct issues with unmatched items/stores. If the Unmatched Stores and/or Unmatched Items reports returned results. Make the necessary corrections to those items and/or stores and click
Synch Store/Items. This will correct the POS data without having to correct then re-import the POS data.